View PPTX files
View PPTX files in C#
GroupDocs.Viewer for .NET (which is a part of Conholdate.Total for .NET) allows you to render your presentations in HTML, PDF, PNG, and JPEG formats. You do not need to use Microsoft PowerPoint or other software to load and view presentations within your .NET application (web or desktop).
Create a Viewer class instance to get started with the GroupDocs.Viewer API. Pass a presentation you want to view to the class constructor. You can load the presentation from a file or stream. Call one of the Viewer.View method overloads to convert the presentation to HTML, PDF, or image format. These methods allow you to render the entire presentation or specific slides.
Viewer API can detect the document format automatically based on information in the file header.
Render presentations as HTML
Create an HtmlViewOptions class instance and pass it to the Viewer.View method to convert a presentation file to HTML. The HtmlViewOptions class properties allow you to control the conversion process. For instance, you can embed all external resources in the generated HTML file, minify the output file, and optimize it for printing.
Create an HTML file with embedded resources
To save all elements of an HTML page (including text, graphics, and stylesheets) into a single file, call the HtmlViewOptions.ForEmbeddedResources method and specify the output file name.
using GroupDocs.Viewer;
using GroupDocs.Viewer.Options;
// ...
using (var viewer = new Viewer("sample.pptx"))
{
// Create an HTML file for each slide.
// {0} is replaced with the current page number in the file name.
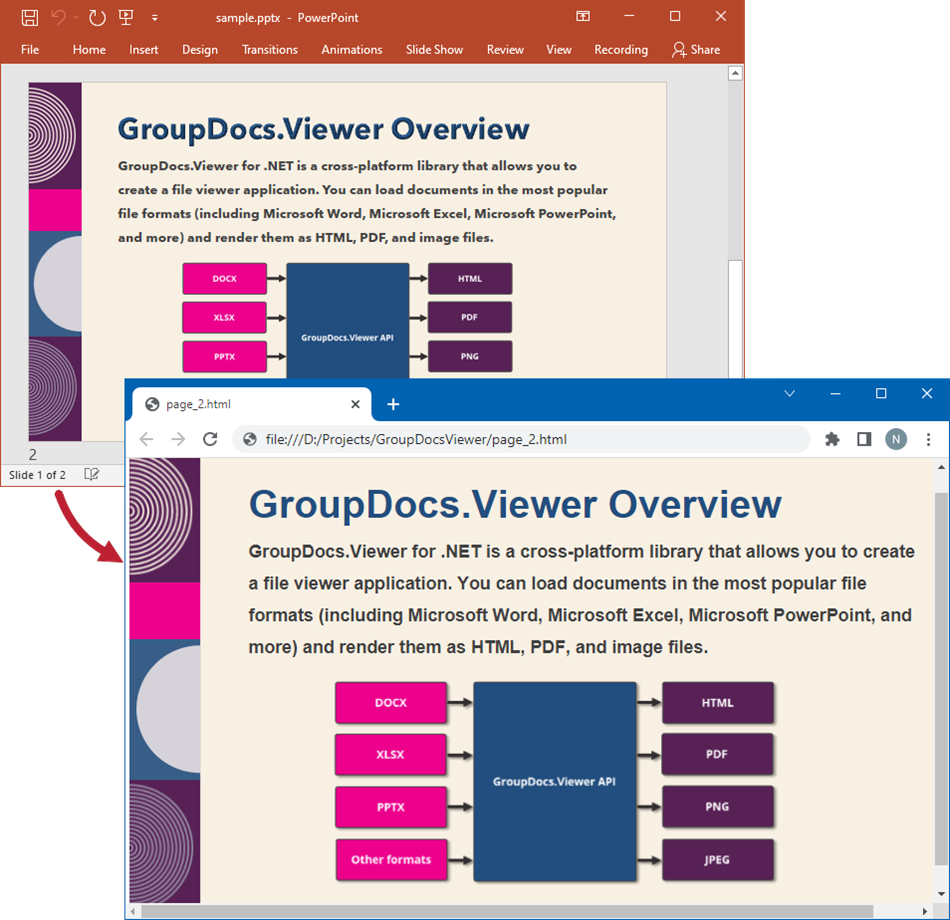
var viewOptions = HtmlViewOptions.ForEmbeddedResources("page_{0}.html");
viewer.View(viewOptions);
}
The following image demonstrates the result:
Create an HTML file with external resources
If you want to store an HTML file and additional resource files (such as fonts, images, and stylesheets) separately, call the HtmlViewOptions.ForExternalResources method and pass the following parameters:
- The output file path format
- The path format for the folder with external resources
- The resource URL format
using GroupDocs.Viewer;
using GroupDocs.Viewer.Options;
// ...
using (var viewer = new Viewer("sample.pptx"))
{
// Create an HTML file for each slide.
// Specify the HTML file names and location of external resources.
// {0} and {1} are replaced with the current page number and resource name, respectively.
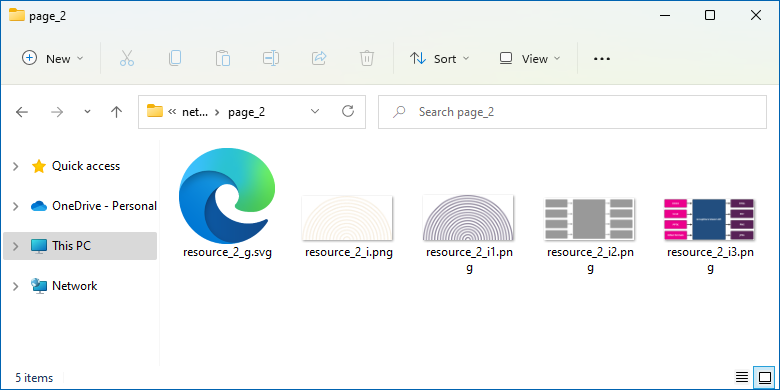
var viewOptions = HtmlViewOptions.ForExternalResources(
"page_{0}.html", "page_{0}/resource_{0}_{1}", "page_{0}/resource_{0}_{1}");
viewer.View(viewOptions);
}
The image below demonstrates the result. External resources are placed in a separate folder.
Render presentations as PDF
Create a PdfViewOptions class instance and pass it to the Viewer.View method to convert a presentation file to PDF. The PdfViewOptions class properties allow you to control the conversion process. For instance, you can protect the output PDF file, reorder its pages, and specify the quality of document images.
using GroupDocs.Viewer;
using GroupDocs.Viewer.Options;
// ...
using (var viewer = new Viewer("sample.pptx"))
{
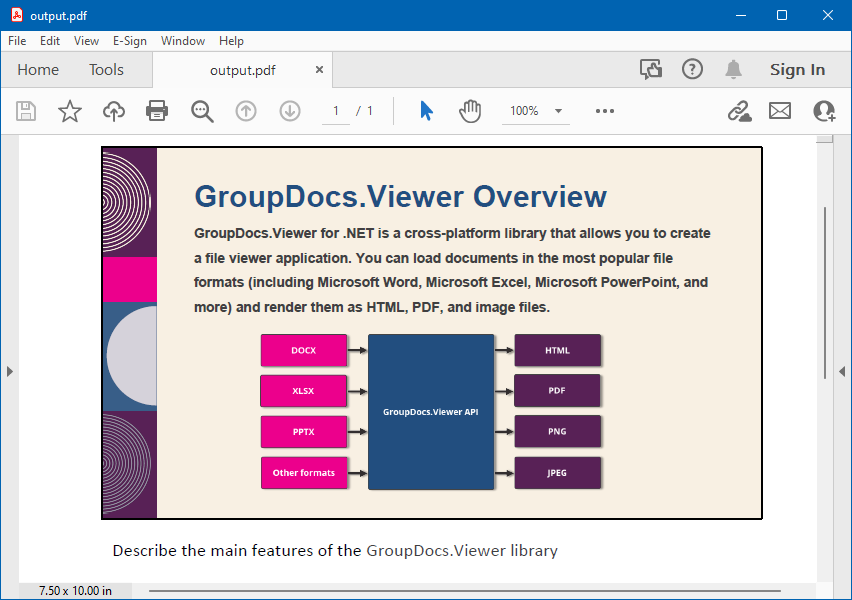
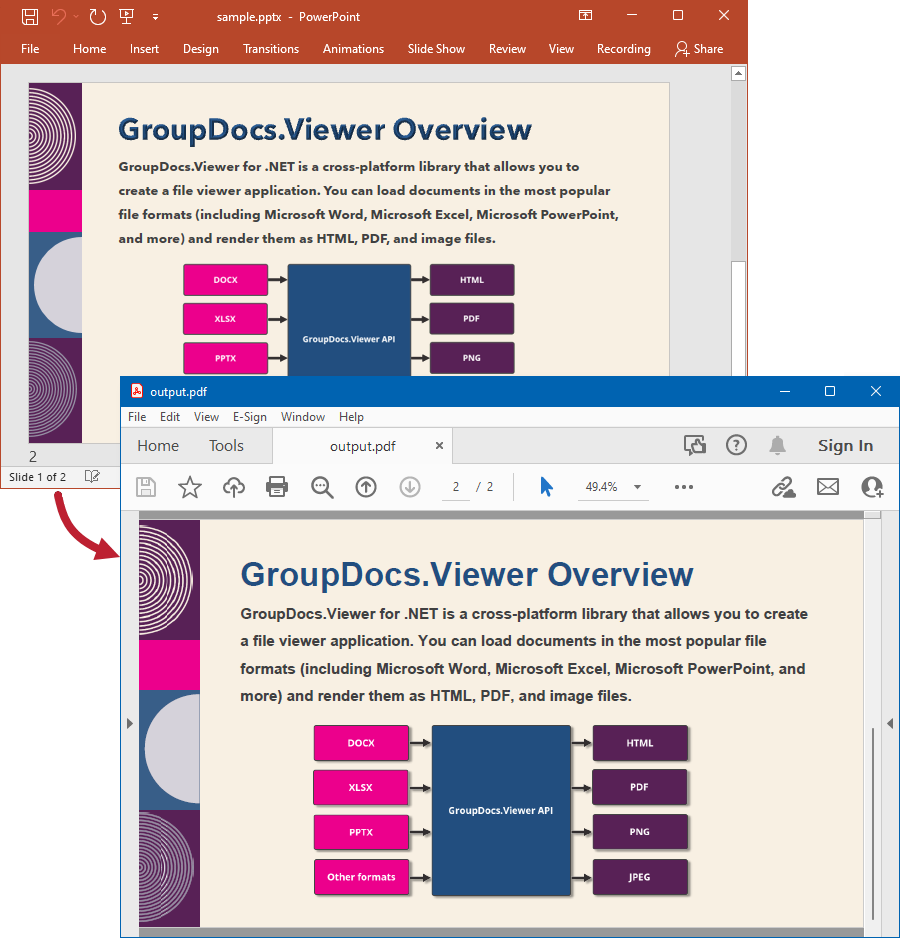
var viewOptions = new PdfViewOptions("output.pdf");
viewer.View(viewOptions);
}
The following image demonstrates the result:
Render presentations as PNG
Create a PngViewOptions class instance and pass it to the Viewer.View method to convert a presentation file to PNG. Use the PngViewOptions.Height and PngViewOptions.Width properties to specify the output image size in pixels.
using GroupDocs.Viewer;
using GroupDocs.Viewer.Options;
// ...

using (var viewer = new Viewer("sample.pptx"))
{
    // Create a PNG image for each slide.
    // {0} is replaced with the current page number in the image name.
    var viewOptions = new PngViewOptions("output_{0}.png");
    viewOptions.Width = 950;
    viewOptions.Height = 550;
    viewer.View(viewOptions);
}
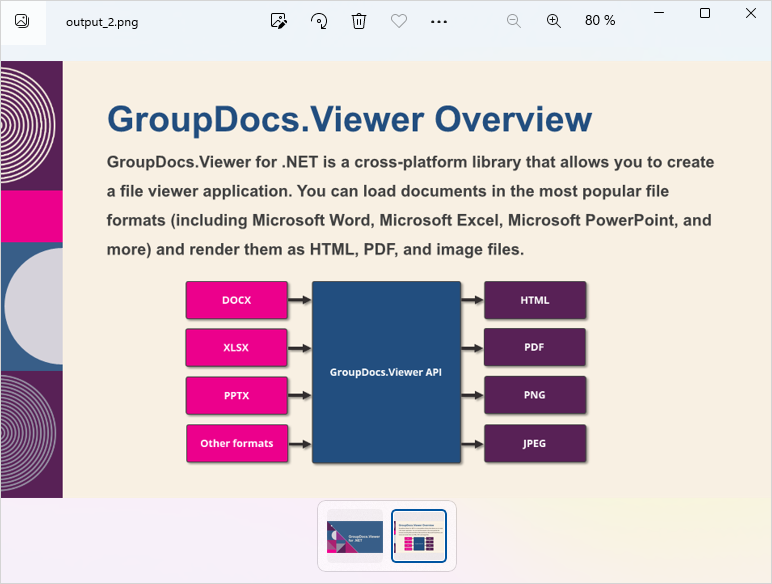
The following image demonstrates the result:
Render presentations as JPEG
Create a JpgViewOptions class instance and pass it to the Viewer.View method to convert a presentation file to JPEG. Use the JpgViewOptions.Height and JpgViewOptions.Width properties to specify the output image size in pixels.
using GroupDocs.Viewer;
using GroupDocs.Viewer.Options;
// ...

using (var viewer = new Viewer("sample.pptx"))
{
    // Create a JPEG image for each slide.
    // {0} is replaced with the current page number in the image name.
    var viewOptions = new JpgViewOptions("output_{0}.jpg");
    viewOptions.Width = 950;
    viewOptions.Height = 550;
    viewer.View(viewOptions);
}
Specify image resolution
When you convert presentations with high-resolution images to other formats, you may need to lower image resolution to reduce the output file size. GroupDocs.Viewer supports the PresentationOptions.Resolution option that allows you to compress images in the output HTML and PDF files. To access this option, use the HtmlViewOptions.PresentationOptions or PdfViewOptions.PresentationOptions property (depending on the output file format).
You can set the PresentationOptions.Resolution property to one of the following Resolution field values:
| Resolution field | DPI | Remarks |
|---|---|---|
| DocumentResolution | As in the source file | This is the default value. |
| Dpi72 | 72 | Maximum image compression and minimum file size. |
| Dpi96 | 96 | Good for web pages and projectors. |
| Dpi150 | 150 | Good for web pages and projectors. |
| Dpi220 | 220 | Excellent quality on most printers and screens. |
| Dpi330 | 330 | Good quality for high-definition (HD) displays. |
The following example demonstrates how to specify image resolution in code:
using GroupDocs.Viewer;
using GroupDocs.Viewer.Options;
// ...

using (var viewer = new Viewer("sample.pptx"))
{
    var viewOptions = new PdfViewOptions("output.pdf");
    viewOptions.PresentationOptions.Resolution = Resolution.Dpi150;
    viewer.View(viewOptions);
}
Render hidden slides
If your presentation contains hidden slides, enable the ViewOptions.RenderHiddenPages property for a target view to display these slides in the output HTML, PDF, or image files.
The following code example uses this option to display hidden slides in the generated PDF file:
using GroupDocs.Viewer;
using GroupDocs.Viewer.Options;
// ...

using (var viewer = new Viewer("sample.pptx"))
{
    var viewOptions = new PdfViewOptions("output.pdf");
    viewOptions.RenderHiddenPages = true;
    viewer.View(viewOptions);
}
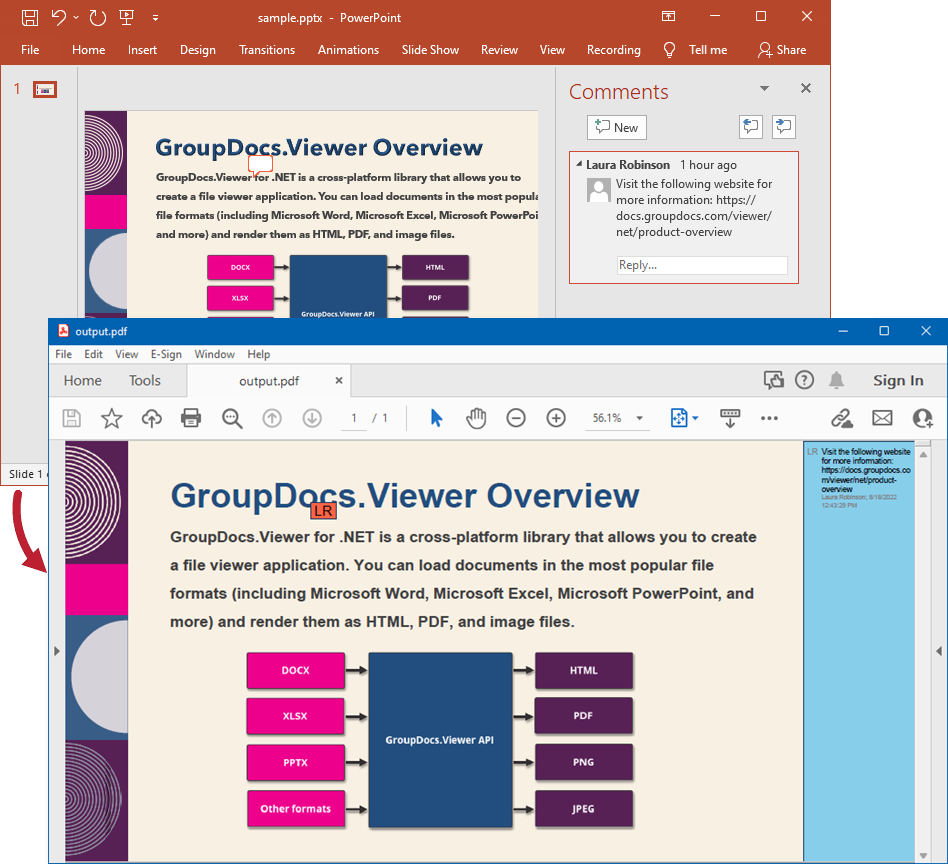
Render comments
Enable the ViewOptions.RenderComments option for a target view to display comments in the output file when you convert your presentation to HTML, PDF, PNG, or JPEG format.
using GroupDocs.Viewer;
using GroupDocs.Viewer.Options;
// ...

using (var viewer = new Viewer("sample.pptx"))
{
    var viewOptions = new PdfViewOptions("output.pdf");
    viewOptions.RenderComments = true;
    viewer.View(viewOptions);
}
The following image demonstrates the result:
Render speaker notes
A presentation file can contain speaker notes that help presenters recall important information during the presentation. Speaker notes appear in the Notes pane below each slide.
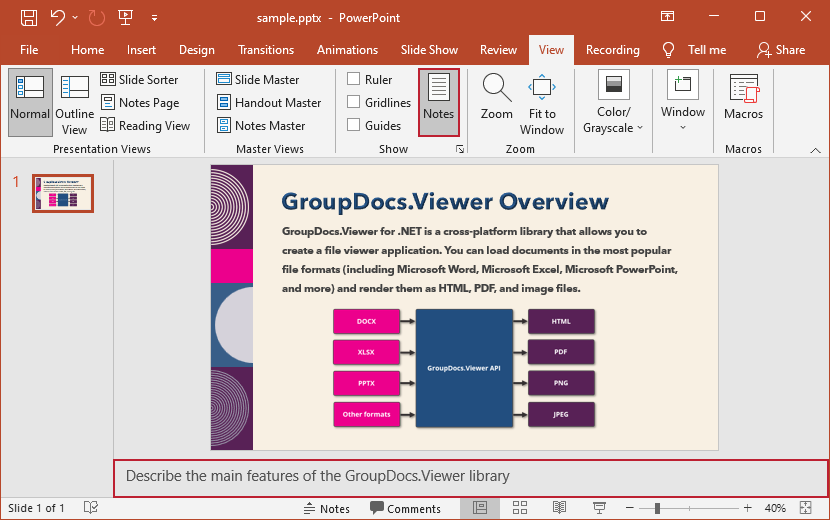
Enable the ViewOptions.RenderNotes property for a target view to display speaker notes in the output HTML, PDF, or image files.
The following code sample renders a presentation with speaker notes to PDF:
using GroupDocs.Viewer;
using GroupDocs.Viewer.Options;
// ...

using (var viewer = new Viewer("sample.pptx"))
{
    var viewOptions = new PdfViewOptions("output.pdf");
    viewOptions.RenderNotes = true;
    viewer.View(viewOptions);
}
The image below demonstrates the result.